Palworld 1.0 Dedicated Server: A Docker Homelab Build on Ubuntu 26
Palworld hit its 1.0 release this past week, and after watching the patch notes roll in I decided it was time to spin up a dedicated server rather than rely on peer-to-peer sessions that die when the host alt-tabs. I've been running Proxmox in my homelab for a while now (related to homelab-as-creative-outlet), so the path from "I want to play this" to "I have infrastructure for this" was short. The whole build took about an hour from VM creation to first successful client connection, with most of that hour spent on a DNS gotcha that I'll call out explicitly below.
The VM started as an Ubuntu 26 template I'd previously built with Packer (that Packer template workflow is probably worth its own post at some point, since it makes spinning up consistent VMs trivially repeatable). From there it was Docker installation, a single compose file, and some firewall rules. This post documents the full path, including the parts that didn't work on the first try.
The Stack
| Component | Choice | Notes |
|---|---|---|
| Hypervisor | Proxmox VE | Existing cluster in the homelab |
| VM OS | Ubuntu 26.04 | Built from Packer template |
| Container runtime | Docker CE + Compose plugin | Official Docker repo, noble codename |
| Server image | thijsvanloef/palworld-server-docker:latest |
Well-maintained community image |
| Network mode | Host networking | Simplifies UDP port exposure for game traffic |
Step 1: Docker Engine and Compose
Fresh Ubuntu 26 VM, no Docker installed yet, 50GB in total VM size should be sufficient (on an SSD). Docker's official repository doesn't have an Ubuntu 26 codename entry as of this writing, so I pointed at noble (24.04) which works fine for the packages.
sudo apt-get update
sudo apt-get install -y ca-certificates curl gnupg

sudo install -m 0755 -d /etc/apt/keyrings
curl -fsSL https://download.docker.com/linux/ubuntu/gpg | sudo gpg --dearmor --yes -o /etc/apt/keyrings/docker.gpg
sudo chmod a+r /etc/apt/keyrings/docker.gpg

ARCH="$(dpkg --print-architecture)"
printf "deb [arch=%s signed-by=/etc/apt/keyrings/docker.gpg] https://download.docker.com/linux/ubuntu noble stable\n" "$ARCH" \
    | sudo tee /etc/apt/sources.list.d/docker.list >/dev/null

sudo apt-get update
sudo apt-get install -y docker-ce docker-ce-cli containerd.io docker-buildx-plugin docker-compose-plugin
sudo systemctl enable --now docker
Optional but recommended for not typing sudo on every Docker command:
sudo usermod -aG docker $USER
newgrp docker
Verify everything installed correctly:
docker --version
docker compose version
docker run --rm hello-world
If you hit a Malformed entry error on the apt sources file (I did, on my first attempt because of a copy-paste formatting issue), the fix is to delete and recreate the sources entry:
sudo rm -f /etc/apt/sources.list.d/docker.list
ARCH="$(dpkg --print-architecture)"
printf "deb [arch=%s signed-by=/etc/apt/keyrings/docker.gpg] https://download.docker.com/linux/ubuntu noble stable\n" "$ARCH" \
    | sudo tee /etc/apt/sources.list.d/docker.list >/dev/null
sudo apt-get update
Step 2: The Compose Stack
Create the working directory and compose file:
sudo mkdir -p /opt/palworld
sudo chown -R $USER:$USER /opt/palworld
Here's the full /opt/palworld/compose.yaml:
services:
  palworld:
    image: thijsvanloef/palworld-server-docker:latest
    container_name: palworld
    restart: unless-stopped
    network_mode: host
    environment:
      TZ: "America/Chicago"
      SERVER_NAME: "Homelab Palworld"
      SERVER_DESCRIPTION: "Homelab server"
      PLAYERS: "16"
      COMMUNITY: "false"
      MULTITHREADING: "true"
      ADMIN_PASSWORD: "REPLACE_WITH_STRONG_PASSWORD"
      SERVER_PASSWORD: ""
      BACKUP_ENABLED: "true"
      UPDATE_ON_BOOT: "true"
    volumes:
      - ./data:/palworld
Validate the YAML, bring it up, and watch the logs for first-boot download (the game server binary downloads on first launch, which takes a few minutes):
docker compose -f /opt/palworld/compose.yaml config
docker compose -f /opt/palworld/compose.yaml up -d
docker compose -f /opt/palworld/compose.yaml logs -f --tail=200
You're looking for a line in the logs that says the server is ready to accept connections. The first boot takes longer because it pulls the full game server files via SteamCMD internally.
Step 3: Gameplay Settings via Environment Variables
The Docker image exposes most Palworld gameplay settings as environment variables, which is the cleanest way to manage them. Add these under environment: in compose.yaml to taste:
      DEATH_PENALTY: "None"
      PLAYER_STOMACH_DECREASE_RATE: "0.5"
      PAL_STOMACH_DECREASE_RATE: "0.5"
      PLAYER_STAMINA_DECREASE_RATE: "0.7"
      EXP_RATE: "2.0"
      PAL_SPAWN_NUM_RATE: "1.5"
      WORK_SPEED_RATE: "1.5"
      COLLECTION_DROP_RATE: "2.0"
      ENABLE_FAST_TRAVEL: "true"
I tuned these toward a more relaxed solo/family experience: no death penalty, slower hunger, faster XP. If you're running a competitive server you'd want stock values or harder settings, but for a homelab server where the audience is me and potentially my kids, quality-of-life adjustments make sense.
The workflow for changing settings after initial setup:
- Edit
/opt/palworld/compose.yaml - Validate with
docker compose -f /opt/palworld/compose.yaml config - Recreate the container with
docker compose -f /opt/palworld/compose.yaml up -d - Confirm in logs that settings applied
There is also a manual settings file at /opt/palworld/data/Pal/Saved/Config/LinuxServer/PalWorldSettings.ini if you need settings not exposed as environment variables, but stop the container before editing it manually and know that environment variables in the compose file will override .ini values on next boot.
Step 4: Firewall
If UFW is running on the VM (it was on mine):
sudo ufw allow 8211/udp    # Game traffic
sudo ufw allow 27015/udp   # Steam query
sudo ufw allow 25575/tcp   # RCON (optional, for remote admin)
sudo ufw status
The DNS Gotcha (This One Got Me)
This is the part that cost me ten minutes of troubleshooting and deserves a callout. Palworld's multiplayer client does not accept DNS names when joining a dedicated server. I had a local DNS entry (palworld.home.lab) pointed at the VM's IP, and the in-game join dialog simply wouldn't connect using it, even though DNS resolved correctly from the client machine.
The fix is straightforward: use the raw IP address and port.
192.168.1.50:8211
Don't assume palworld.yourdomain.com:8211 will work in the in-game server browser or direct-connect field, even if your DNS is configured perfectly. This appears to be a limitation of the game client itself rather than anything server-side. Document the IP and port for anyone joining your server, because that's what they'll need to type.
Step 5: Daily Restart and Reboot Persistence
Palworld servers (like many game servers) benefit from periodic restarts to manage memory pressure over long uptimes. I added a simple cron job for a daily 5:15 AM restart:
sudo mkdir -p /opt/palworld/logs
sudo chown $USER:$USER /opt/palworld/logs
touch /opt/palworld/logs/cron-restart.log

(crontab -l 2>/dev/null | grep -v '/usr/bin/docker compose -f /opt/palworld/compose.yaml restart'; \
  echo '15 5 * * * /usr/bin/docker compose -f /opt/palworld/compose.yaml restart >> /opt/palworld/logs/cron-restart.log 2>&1') | crontab -
For reboot persistence, the combination of restart: unless-stopped in the compose file and systemctl enable docker ensures the server comes back automatically after a VM reboot. I validated this with an actual reboot:
sudo reboot
# After reconnecting:
systemctl is-enabled docker
systemctl is-active docker
docker compose -f /opt/palworld/compose.yaml ps
Step 6: Routine Operations
Quick reference for day-to-day management:
# Start
docker compose -f /opt/palworld/compose.yaml up -d

# Stop
docker compose -f /opt/palworld/compose.yaml down

# Restart
docker compose -f /opt/palworld/compose.yaml restart

# Status
docker compose -f /opt/palworld/compose.yaml ps

# Live logs
docker compose -f /opt/palworld/compose.yaml logs -f --tail=200
Step 7: Updating
Game server updates and Docker engine updates are separate concerns:
# Update Docker packages
sudo apt-get update
sudo apt-get install -y docker-ce docker-ce-cli containerd.io docker-buildx-plugin docker-compose-plugin

# Pull latest Palworld image and recreate
docker compose -f /opt/palworld/compose.yaml pull
docker compose -f /opt/palworld/compose.yaml up -d
docker image prune -f
The UPDATE_ON_BOOT: "true" environment variable also handles game server updates on container restart, so for most routine updates the cron restart handles it automatically.
In-Game
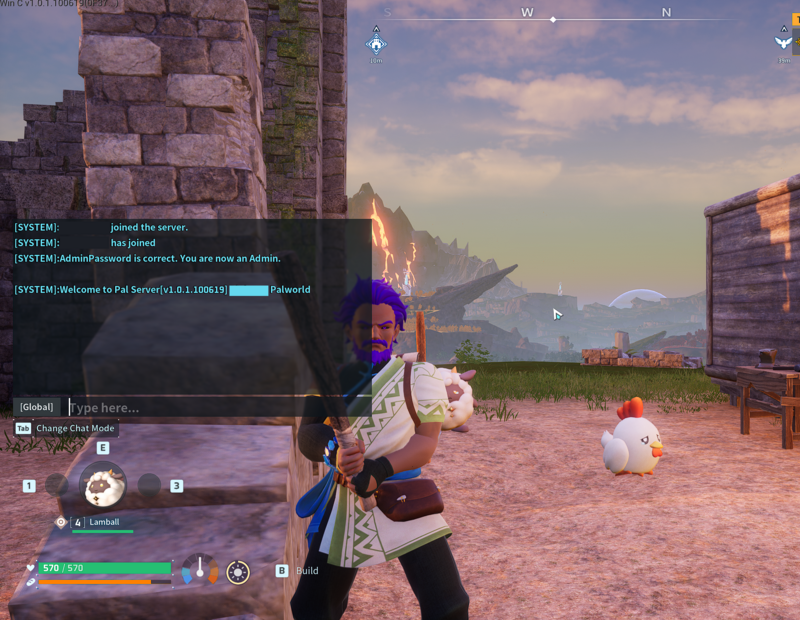
The 1.0 release feels polished compared to the early access builds I'd tried previously. The base-building loop is solid, the pal capture mechanics are satisfying, and the open world has enough variety to keep exploration interesting. I'm considering whether my kids (four and six, so probably just the six year old) might want to join me on the server, though the gunplay elements give me pause. The game does involve firearms alongside the creature-catching mechanics, and while it's not graphic violence, it's more combat-forward than something like Minecraft. We'll see. The server is there if they're interested, and the relaxed gameplay settings I configured would make it forgiving enough for younger players to enjoy the exploration and base-building without getting frustrated by difficulty.
Lessons Learned
The whole project reinforces something I keep coming back to with homelab work: the gap between "I want to run this thing" and "it's running reliably" is almost always smaller than you expect when you use containers. The Palworld community Docker image handles the SteamCMD bootstrapping, the game server configuration, and the update lifecycle. My job was just to provide the compute, the compose file, and the network access. Total active time was about an hour, most of which was the DNS troubleshooting.
The Packer-built Ubuntu template made the VM provisioning itself trivial (clone template, assign resources, boot, done), and that's a workflow I want to write up separately because it applies to any homelab VM you'd want to spin up quickly. If you're running Proxmox and you're still building VMs from ISOs manually, templates are worth the one-time investment.
Next steps for this server: see if the kids want in, maybe tweak spawn rates after playing for a week to see how the pacing feels, and possibly set up a backup export to a NAS share. For now though, it's running, it's stable, and I'm catching pals in a server that lives ten feet from my desk.